Tuesday, August 14, 2012

Dresser & Nightstand Revamp


I LOVE getting my hands on new projects and trying things out.  So when I had the opportunity to help my friend makeover a matching dresser and nightstand I was ecstatic!  

She had previously bought this set several years ago from Target.  

the nightstand - 

 
the dresser - 

 
Both pieces are made out of particle board,  which has held up over the years except for the legs that cracked and broke off due to the weight of the dresser being moved around.  They just finished adding a bedroom on for one her kids and I talked her into revamping it for his new room!

I thought it would be great to cut off the existing legs, square it off and install wood underneath to attach new pretty bun feet to.  They picked out the same bun feet that I used on the printer/hard drive stand I made previously.  The great thing about these in particular is that they are inexpensive for bun feet, at only $3 per foot.  Secondly, they are great because you can use a miter saw to shorten the length to what you need and still get a decorative foot. 

For her dresser, I cut off the very bottom round end you see below - 

 
Next I measured and marked at the top of the existing legs across the bottom side and bottom front of the dresser -


Then I took the jigsaw and cut along those marked lines squaring off the corners - 


Now it was time to start with adding braces underneath to screw the bun feet into and also so the tops of the bun feet were flush with the bottom of the dresser.  We first tried using 1x2 boards -


However, quickly found that the wood split when screwing it in and also that it wasn't wide enough to support the bun feet.  We added a small second piece of the 1x2 to help brace the bun feet - 


 The dresser initially had a center support that matched the original legs.  After removing that we added another bun foot in it's place -

 
 After installing and working with the 1x2 board supports above, we decided to switch things up with the nightstand.  So we removed the 1x2 wood boards, and used a 1x3 mdf trim scrap instead...it worked perfectly! -


 Here is the dresser upright with the new bun feet...


 After priming and spray painting them a medium brown, and adding new knobs...they turned out like this! - 


dresser before:

dresser after:

nightstand before:

nightstand after:

Now they look so updated and custom without the cost of new bedroom furniture!!

Monday, August 6, 2012

BIG Thanks!

I am a little late in posting this, but my sweet mom surprised me with this Pottery Barn Pillow Cover that I have been drooling over for months and months!!  I just want to say "THANKS mom!", I love it and it is as perfect as I thought it would be in the room!


I'm not going to lie, it is definitely GREAT to be the only daughter of a mom who has a love for decorating as much as I do!! ;)


But more than anything, I am incredibly grateful for our relationship and your friendship.  I LOVE you mom!! 
xoxo

Friday, August 3, 2012

Roman Shade Tutorial

A few years ago I had a client that wanted roman shades in a room renovation we were working on.  We specifically wanted them custom made out of a coordinating fabric in the room.  After sub-contracting the project out, and hundreds of dollars later...I wanted to give them a go, and try to make my own for a fraction of the cost.  

I found a website Terrell Designs, who is a roman shade pro.  I watched her tutorial on "how to make a roman shade", and combined quite a few of the steps she suggested, along with some of the ideas I got from the custom roman's we had made for my client.  One of my favorite things about Terrell's website, is her roman shade hardware calculator (you can find the link for it on the right side of her homepage).  It conveniently instructs you on fabric measurements, how many battens and lift lines you need and where to put them, and stackage information...all based on the measurements of your window.  

Here are some of the roman shades I have made over the years with the tutorial you will see below...


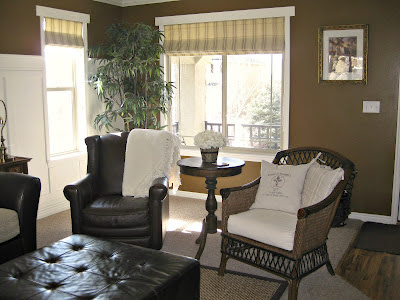
And most recently, the one I did this week for my loft makeover:


Here is my tutorial on making a roman shade! - 

Start by measuring your window, the window I did above is 46.5 inches wide by 46.5 inches long.  I started by cutting my fabric 47 inches wide by 61 inches long.  I always add 1/2 inch to the width for my final measurements (I do 1/4 inch seams), and about 5-8 inches more in length than the hardware calculator states due to the difference in my construction of the shade.

When filling out the hardware calculator for your shade, you will need to enter three numbers...your window width, window length, and ideal stackage.  Stackage is the the length of your shade once it is drawn all the way up.  The general rule for ideal stackage is 15-20% of your window length.  Since my window is 46.5 inches long, 20% is just under 10 inches.  It is a personal preference how long you want your shade length to rest when drawn.  I prefer mine longer so you can see more of the fabric,  which is why I chose 10" inches for my stackage. 


After I cut my fabric out to the specifications I needed, I cut out the drapery liner as well.  I used to use muslin to back my fabrics; however, I now use Roc-lon drapery fabric instead.  It helps protect your fabric from UV rays and is very easy to work with.  You can find it at most fabric stores. 


Place your fabric and liner fronts together.  Sew the sides and one end of the combined pieces (that end you sew will be the bottom of your shade). - 


Now you have to create your batten/wood dowel pockets.

For my particular window, the hardware calculator stated the following:

"Place first (lowest) batten 6.75 inches up from the bottom of the shade. This is the Lower Drop."

Remember, the bottom of your shade is the part of your shade that is sewn.  Start from the bottom and measure for the lowest batten/dowel.  You will be creating a pocket in the back of your shade for a 3/16 of an inch batten/wooden dowel (I purchase mine at Lowes or Home Depot). 

The website indicated to have my first batten/dowel 6.75" from the bottom of my drape.  To do this, I measured and pinned 6.75 inches up from the bottom edge - 


Once you have pinned where your first batten/dowel is supposed to go, fold the fabric over exactly 1/2" inch above this pinned line -


Sew along this folded line 3/8" of an inch in from the folded edge.  This will create the pocket for your batten/wood dowel - 


The hardware calculator then indicates for me to space the remaining 5 batten/dowel pockets 6 inches apart.  So, I continue the step above; however, this time I measure from the seam I just completed on the first batten/dowel pocket and pin 6 inches up. 


After sewing all the batten/dowel pockets, I end up with this - 


back:


front:


Cut your batten/wood dowels to fit your window treatment width, and slide into the pockets (make sure to put these dowels in BEFORE you you follow the next step, sewing on the lift rings). -


Next I needed to install my lift lines.  Lift lines are the rows of cording that lift your drape up.  Once again, the hardware calculator indicated for my project that I would need to do 4 lift lines.  


I like to put the first two of my lift lines on the ends of my drape (attaching the plastic lift rings 1" inch from the edge of the drape), and centering out the remaining ones - 


Always sew your lift rings on every other batten/dowel pocket, starting with the lowest pocket -


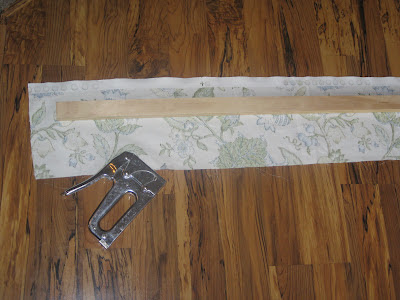
 Next, cut a 1x2 inch board the width of your window (my case 46.5"inches) and wrap it a piece of left over fabric - 


Measure out and screw in "eye screws" onto this fabric covered board so that they line up perfectly with your lift lines - 


Attach your drapery cording to your bottom lift rings and thread through all the lift rings and eye screws on the top board.  I always have my pull cord hang on the right of my drape, so my far left cord needs to be my longest, getting shorter and shorter, with the shortest being on the side gathering to form the cord pull.  - 


You will have extra fabric on the top of your drape that you will need cut off once you attach your fabric covered 1x2 inch board to the top of your drape.  A few times I didn't make mine long enough for my window which is the reason for adding the extra fabric to the length at the beginning of this project. 


Simply staple the top of your drape to your 1x2 inch board where the bottom of your drape hits the window sill perfectly, and cut off excess fabric -


To mount the drape, screw the 1x2 inch board into the inside of your window frame - 


Use a "cord cleat" to wind your cord pull up when the drape is drawn-


And there you have it!  I hope this tutorial makes sense and is helpful, and saves you a bundle of money by creating your own beautiful window coverings!!

Thursday, August 2, 2012

Loft Makeover Reveal

Originally for the space below I was going to do more bookshelves like I did on the North side of our loft here. However, my husband didn't think we needed anymore bookshelves...to hold the many books that we didn't own.  He suggested instead that I create a reading nook since I LOVE to read (yes, I read and don't have very many books, go figure!  Some would say that my kindle is literally attached to my hip).  I thought this was a brilliant idea and make the space VERY usable!


Here are some of the changes I am made for the upstairs loft:


I found this chaise from Home Decorators Collection that fit the measurements of the space pictured above perfectly!

 I ordered it in the swatch below, "Groupie Praline":


I also fell in love with this swatch from Fabric.com, P. Kaufmann Boscobel Floral Natural, the colors are exactly what I was looking for for this space.  Bright, cheery, and I loved the combination of the gold, cornflower blue, green, and brown.  I created a new roman shade for the window out of this fabric,  as well as a throw pillow for the chaise - 

I loved this fabric with the floral above so I am adding a second throw pillow to the chaise in this -


 Also from HDC, I ordered this chair for my desk:


Now that I have the white board & batten walls and bookshelves upstairs, the white desk had to go...


so I gave it a makeover!


I am so excited to share with you guys the loft changes I have made!  

south side of loft - 

before:

after:


South side of loft, bookshelf wall-

before:

after:


desk wall-

before:

after:


*For added protection, I had 1/4 inch glass cut specifically for the desktop.

Roman shade-

before:

after:


Full room view of north side -

before:

after: