Friday, November 25, 2011

From Doorway to Archway


Our friends are just finishing up their basement and had a brilliant idea that we just had to copy, turning your basement doorway into an archway!
  When we finished our basement over five years ago, we removed the door and filled in the hinges with putty.  We wanted to make it a continuation of our home, and not feel so much like a 'basement'.  Unfortunately, it still looked like 'someone just took off the door to the basement'.

After hearing of their great idea we decided to have ours done by the same contractor while he was completing theirs as well.  

We went from this - 


To this - 


another angle:

before:


after:
 
The basement now feels more of an extension of our home, rather than a separation. 


Saturday, November 12, 2011

"I am Thankful for..." Printable Craft Strips Wreath


Anyone else enjoying
too???

If you are as much as me you may have seen these cute little "I am thankful for..." craft strips that can be used in a multitude of ways; garlands, napkin ring holders, etc.  

Silverboxcreative.com provides a link for the download for the free printables here.


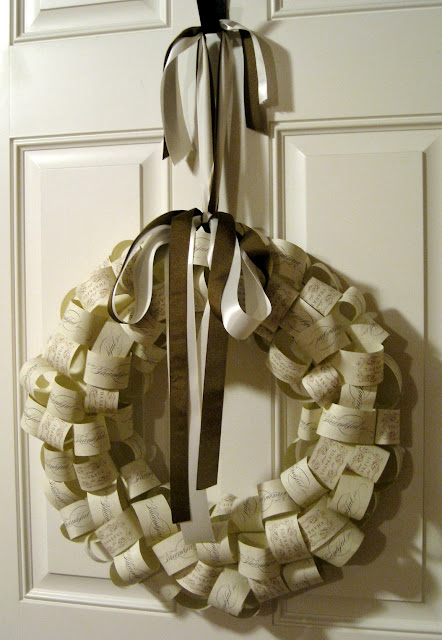
  Last weekend my sweet friend and I hung out and she brought over this fun and festive craft for us to try.  She left me with some extra rings so I decided to try and make a wreath with them...I think it turned out pretty cute!


I started by buying a styrofoam wreath -


Then I hot glued the strips into rings and glued them on the wreath in different directions -


And kept gluing and gluing AND gluing.  Before I went all the way around I gathered the ribbon I wanted to hang it from and tied it around the wreath -


Once tied, I glued the rings over the ribbon so it was hidden and finished filling in the entire wreath - 


Finally after it was complete I tied a very long loose bow onto the ribbon to let it drape over the wreath.


Another fun direction to take these cute little "thankful" strips.

Saturday, November 5, 2011

Storage Ottoman - Finishing Touches - Part 2

If you missed the "how to" build this storage ottoman below, you can find that tutorial here -


Now that I had a finished box, I needed to make it pretty!

I started out by setting my nails in deeper with a nail setter, and filled in all holes, and cracks with Minwax's Stainable Wood Filler -
Then sand, sand, SAND!

I chose Minwax's 'Provincial 211' as the color to stain it.

For those of you who haven't stained before, it is incredibly easy.  Simply dip a clean cloth in stain, wipe and rub into wood in the direction of the grain.  Make sure you apply it evenly and that no stain drips are left unattended.  Continue applying until you reach your desired darkness. (directions recommend sanding in between; however, that is a step I usually skip.)  
I completed the process by spraying a polyurethane top coat in gloss.  I like to use the spray can version to get even coverage and avoid brush strokes.

Next was applying my previously broken bench top:


I decided to use hinges because I knew my kids would never replace the lid after retrieving/returning a blanket back to the ottoman.


After many failed attempts of trying to hold the lid, hinges, and box in place while drilling the screws in by myself...my dear friend came over to help hold everything while I drilled!  What a lifesaver!

and...

We have our selves a very functional, beautiful storage box to hold our blankets in our family room!


I am linking up to:

Photobucket

Friday, November 4, 2011

Storage Ottoman - Building The Box - Part 1

 I needed something to store blankets in our basement in, and plan on putting this storage ottoman behind our couch to hold them.  The backs of the couch that the bench will be against both recline.  I knew that because of that I couldn't make my bench more than 20 inches high.

 To make this storage ottoman I started with the tufted bench cushion dimensions.


I know, I know, you guys are probably thinking..."What in the world is this crazy girl doing, didn't she just have back surgery a month ago?"  BUT, I had my dear sweet hubby come to the store with me, load and unload all my wood from the store to my garage, so all I had to do was saw and hammer. (which was all within my weight limitations, kinda ;).


I started by cutting the long sides of my box first.  I wanted the front piece to extend along the entire front.


Then I cut my side pieces to fit in between my two front pieces.


Then hammered them together with 1 1/2 inch nails.


I cut pieces going along the width of the box because I was using a miter saw and couldn't cut pieces long enough length wise.


I cut the pieces to fit until it was all closed up.


Now I had a finished box!


Next, add your bun feet.  I simply drilled a hole slightly smaller than the screw that came on my bun feet and screwed in the feet.


And...you have a storage box with feet!


Tomorrow Part 2 will show you how I finished it off!


Thursday, November 3, 2011

Guest Feature: DIY Ottoman by the Do It Yourself Divas

Recently I was inspired by the very talented and amazing Do It Yourself Divas, go check out all their different projects...you won't be disappointed!  

After seeing their 'by scratch' ottoman here, I decided that THAT was what I was going to do with my broken bench that was no longer functional.

Isn't theirs beautiful?!


Tomorrow I will post how I built mine, and a few changes I made a long the way.

Wednesday, November 2, 2011

Broken Bench

Months ago I was excited to find and purchase this beautiful bench on KSL (similar to Craigslist) for $20. 


I loved the fabric, and it made a nice addition to the bottom of our bed in our master bedroom. 

 
As I mentioned above I said I was excited to find it, not we...implying my husband and I.  The good sport he is, he picked it up for me on his way home from work.  However, he was not keen on having it there at the end of our bed.  Even though there was plenty of room to add it there, he knew we would stub our toes on it in the middle of the night and would end up being in the way.  You know what?!  He was right, and the one time I did stub my foot on it I had to bite my tongue because I didn't want to add fuel to his fire. :)

My kids loved to lay across or sit on it to watch TV in our room.  So I only assume, it was from their constant 'love' and 'affection' that this is what happened to it:
So, so sad. :(

But, I think it may have been a blessing in disguise.  

One, because my husband is happy that it was broken and no longer there.

And two, because the cushion top was still in perfect condition and I found something awesome to turn it into.


I have been working on it this past week and can't wait to show you what it will be!


Tuesday, November 1, 2011

November Decorating Tip Of The Month

How To Make a Roman Shade - 

This site is great and has a "Hardware Calculator" that allows making your own Roman Shades so much simpler.  All you need to do is plug in the dimensions you want your finished product to be, answer a few simple questions regarding the shade you desire, and it provides all the necessary information you need to make it.  The site also contains instructions, FAQs, and variations of styles to help you prior and also along the way. 
 
Here is one I made using this site and their "Hardware Calculator":


Hope you give it a try!